✨ 10% OFF SITEWIDE! CODE: VB10✨
🎁 A FREE GIFT FOR EVERY ORDER
Trending Now
Popular Products
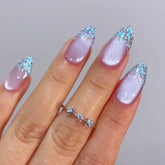
Aurora Bubble
Bring elegance and charm to your fingertips with this new Aurora Bubble glitter press-on nail set! Featuring a vibrant pink cat-eye effect, these nails shimmer with a soft, sweet glow that shifts beautifully with the movement of your hands. The delicate French tips, adorned...
- $49.99
- $49.99
- Unit price
- / per
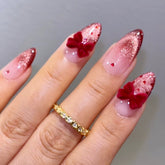
Red Velvet
Add a touch of elegance and sparkle to your fingertips with our newest velvet red cat eye press-on nails. Featuring a rich red gradient with a dazzling cat eye shimmer, this design captures both luxury and warmth. The almond-shaped tips elongate your fingers beautifully,...
- $52.99
- $52.99
- Unit price
- / per
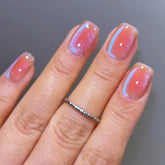
Girl's Dream
Indulge in the mesmerizing glow of our latest Girl's Dream cat eye press-on set. These nails feature a peach-jelly base that exudes a fresh, juicy radiance, beautifully layered with blue cat eye effect for dimensional shimmer. Crafted in a sophisticated square shape, they offer...
- $49.99
- $49.99
- Unit price
- / per
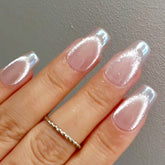
Glazed French
Calling all princesses! This Moonlight Chrome French Tip Press-On Nails is designed to bring an elegant glamor to your look. Featuring a natural nude base that seamlessly transitions into a shiny cat-eye French tip, exuding sophistication with every glance. The translucent chrome finish gives...
- $49.99
- $49.99
- Unit price
- / per
Free shipping on Orders over $46.99
Trending Now
Popular Products
Aurora Bubble
Bring elegance and charm to your fingertips with this new Aurora Bubble glitter press-on nail set! Featuring a vibrant pink cat-eye effect, these nails shimmer with a soft, sweet glow that shifts beautifully with the movement of your hands. The delicate French tips, adorned...
- $49.99
- $49.99
- Unit price
- / per
Red Velvet
Add a touch of elegance and sparkle to your fingertips with our newest velvet red cat eye press-on nails. Featuring a rich red gradient with a dazzling cat eye shimmer, this design captures both luxury and warmth. The almond-shaped tips elongate your fingers beautifully,...
- $52.99
- $52.99
- Unit price
- / per
Girl's Dream
Indulge in the mesmerizing glow of our latest Girl's Dream cat eye press-on set. These nails feature a peach-jelly base that exudes a fresh, juicy radiance, beautifully layered with blue cat eye effect for dimensional shimmer. Crafted in a sophisticated square shape, they offer...
- $49.99
- $49.99
- Unit price
- / per
Glazed French
Calling all princesses! This Moonlight Chrome French Tip Press-On Nails is designed to bring an elegant glamor to your look. Featuring a natural nude base that seamlessly transitions into a shiny cat-eye French tip, exuding sophistication with every glance. The translucent chrome finish gives...
- $49.99
- $49.99
- Unit price
- / per
PREPARE YOUR NATURAL NAILS
- Start with clean, dry nails. Use nail polish remover to remove any previous polish.
- Trim your nails to a short length and file them into your desired shape.
- Gently buff the surface of your nails to create a slightly rough texture. This helps the adhesive tabs stick better.
- Push back your cuticles with a cuticle pusher for a cleaner nail bed.
- Clean your nails with an alcohol wipe or rubbing alcohol to remove any oils or residue.
3 Application Methods
ADHESIVE TABS ONLY
- Select Nail Sizes. Choose the correct size press-on nail for each finger. VettsyBeauty press-ons come with numbers on them to help identify sizes.
- Apply Adhesive Tabs. Select the sticky tab that best fits the size of your natural nail. Peel off one side of the tab and stick it onto your nail, pressing down to ensure it's smooth and firmly in place. Then, peel off the top layer to expose the sticky side.
- Apply Press-On Nails. Press the nail onto the adhesive tab, starting at the cuticle and pressing towards the tip to avoid air bubbles. Press firmly for about 10-20 seconds to ensure a strong bond.
- Tips: Avoid getting your nails wet for at least an hour to allow the adhesive to set properly.
GLUE ONLY
- Select Nail Sizes. Choose the correct size press-on nail for each finger. VettsyBeauty press-ons come with numbers on them to help identify sizes.
- Apply the Glue. Apply a thin layer of glue to your natural nail. You can also put a drop of glue on the press-on nail, but avoid using too much as it can overflow and create a mess.
- Apply the Press-On Nail. Starting at the cuticle, press the nail onto your natural nail, then press down towards the tip to remove any air bubbles and ensure a secure bond. Hold the nail in place for at least 10-20 seconds to allow the glue to set.
- Tips: Avoid getting your nails wet for about an hour after application to ensure the glue has fully set.
COMBINATION: Glue + Adhesives
- Select Press-On Sizes. Match each press-on nail to your natural nails, choosing the size that best fits each nail. If necessary, file the sides of the press-ons for a perfect fit.
- Prepare Adhesive Tabs. Choose adhesive tabs that match the size of your nails. If they're too big, trim them down. Apply the adhesive tab to your natural nail, smooth it out, then remove the top protective layer.
- Apply Glue. Apply a thin layer of nail glue on top of the adhesive tab on your nail. Alternatively, you can apply a small drop of glue to the back of the press-on nail instead of directly on the tab.
- Press and Hold. Align the press-on nail with your natural nail, starting at the cuticle. Press it down firmly, ensuring you smooth it out towards the tip to avoid air bubbles. Hold it in place for about 10-20 seconds to ensure a strong bond.
PRO TIPS FROM EXPERTS
- Choose the Right Size. Always select a press-on nail that matches the size of your natural nail. If in doubt, go slightly smaller rather than larger to avoid the nail sticking to your skin.
- Custom Fit. If you can't find a perfect fit, you can gently file the sides of the press-on nail to tailor it to your nail shape.
- Use Both Glue and Adhesive Tabs. For extra hold, apply an adhesive tab to your nail, then add a drop of glue on top of the tab before pressing the nail on. This combines the staying power of glue with the easy removal of tabs.
- Apply Pressure. After applying the nail, press down firmly for at least 10-20 seconds to ensure a strong bond. Pay extra attention to the edges and the tip.
- Avoid Water Initially. Try not to get your hands wet for at least an hour after application. This gives the adhesive or glue time to fully set.
- Wear Gloves for Chores. Protect your false nails by wearing gloves when doing dishes or cleaning. This prevents prolonged exposure to water and harsh chemicals, which can weaken the adhesive.
- Choosing a selection results in a full page refresh.


